Just a ‘simple’ cap
What is the first thought that comes to your mind, when you are thinking about NIRS? The infrared light? Maybe research you performed with this technology? For me as a product designer for Artinis it was the ‘head-cap’ for months. It’s a relative simple product compared to the NIRS systems, but it should not be neglected. It is in many cases the only physical link between the device and the subject. If this links fails, the system will not work properly, no matter how well the systems itself functions. In this blog post I would like to share some aspects of the development of our NIRS head-caps.
My focus as a product designer is to improve the head-cap in order to enhance the experience of a NIRS measurement for both the researcher and the subject. The challenges we faced in this development were to create an ergonomic fit for all the subjects, the flexibility of the researcher to measure any brain area, to handle the weight of our 100+ channel Oxymon fibers [1], an ‘optode grid’ specially designed for NIRS and compatible with our Oxymon, Brite, Octamon optodes and optode/electrode holders (classic, pinch, NIRS/EEG, Ring Electrode holder, etc.). Here I will explain how we managed to tackle these ‘challenges’ in order to create the Artinis (NIRS) head-cap.
We started this design process with the question: Which brain regions are of interest for you as a user? Technically speaking, every brain region could be of interest for you. This is why we believe that the cap should cover the entire scalp. It seems obvious, but I have seen many head-caps of the competition that forget to cover e.g. the entire prefrontal cortex. As shown in figure 1, the frontal outline of the cap ends slightly above your eyebrows, while the back of the head-cap covers the whole visual cortex.
Figure 1: Head-cap design which uses all the characteristics of the human head
Also the head shape of each individual is unique. But there are also so many similar characteristics which I as a designer use. E.g. the relation between the size of the head circumference, distance between the nasion to inion and ear to ear are used to create the overall shape. The overall curvature on your forehead, the flat area on the side of your head or the small bump (inion) on the backside of your head are used to generate an equal amount of pressure. We used the space below your chin to secure the head-cap and limit movement artefacts during a measurement. Our design in figure 1 illustrates that we used the characteristics to shape the head-cap and generate a comfortable fit for each individual while the cap covers all the brain regions of interest.
We designed the Artinis head-cap with pen and paper. How did we managed to translate our ideas into a functional prototype? We started by selecting the material. We wanted a material that is comfortable to wear for multiple hours, sturdy enough to handle the weight of our 100+ channel system and easy to clean for hygienic purposes [2]. We tested multiple fabrics but also silicone. Neoprene fabric proved to be the most suitable material for our application. After multiple iterations of prototypes, we were able to create a satisfactory cap. The Artinis head-cap shown in figure 2 implements all features we initially specified, including covering all brain regions of interest [3]. Figure 2 also shows us a special designed ‘optode grid’. In the next section I will explain how we developed this NIRS grid.

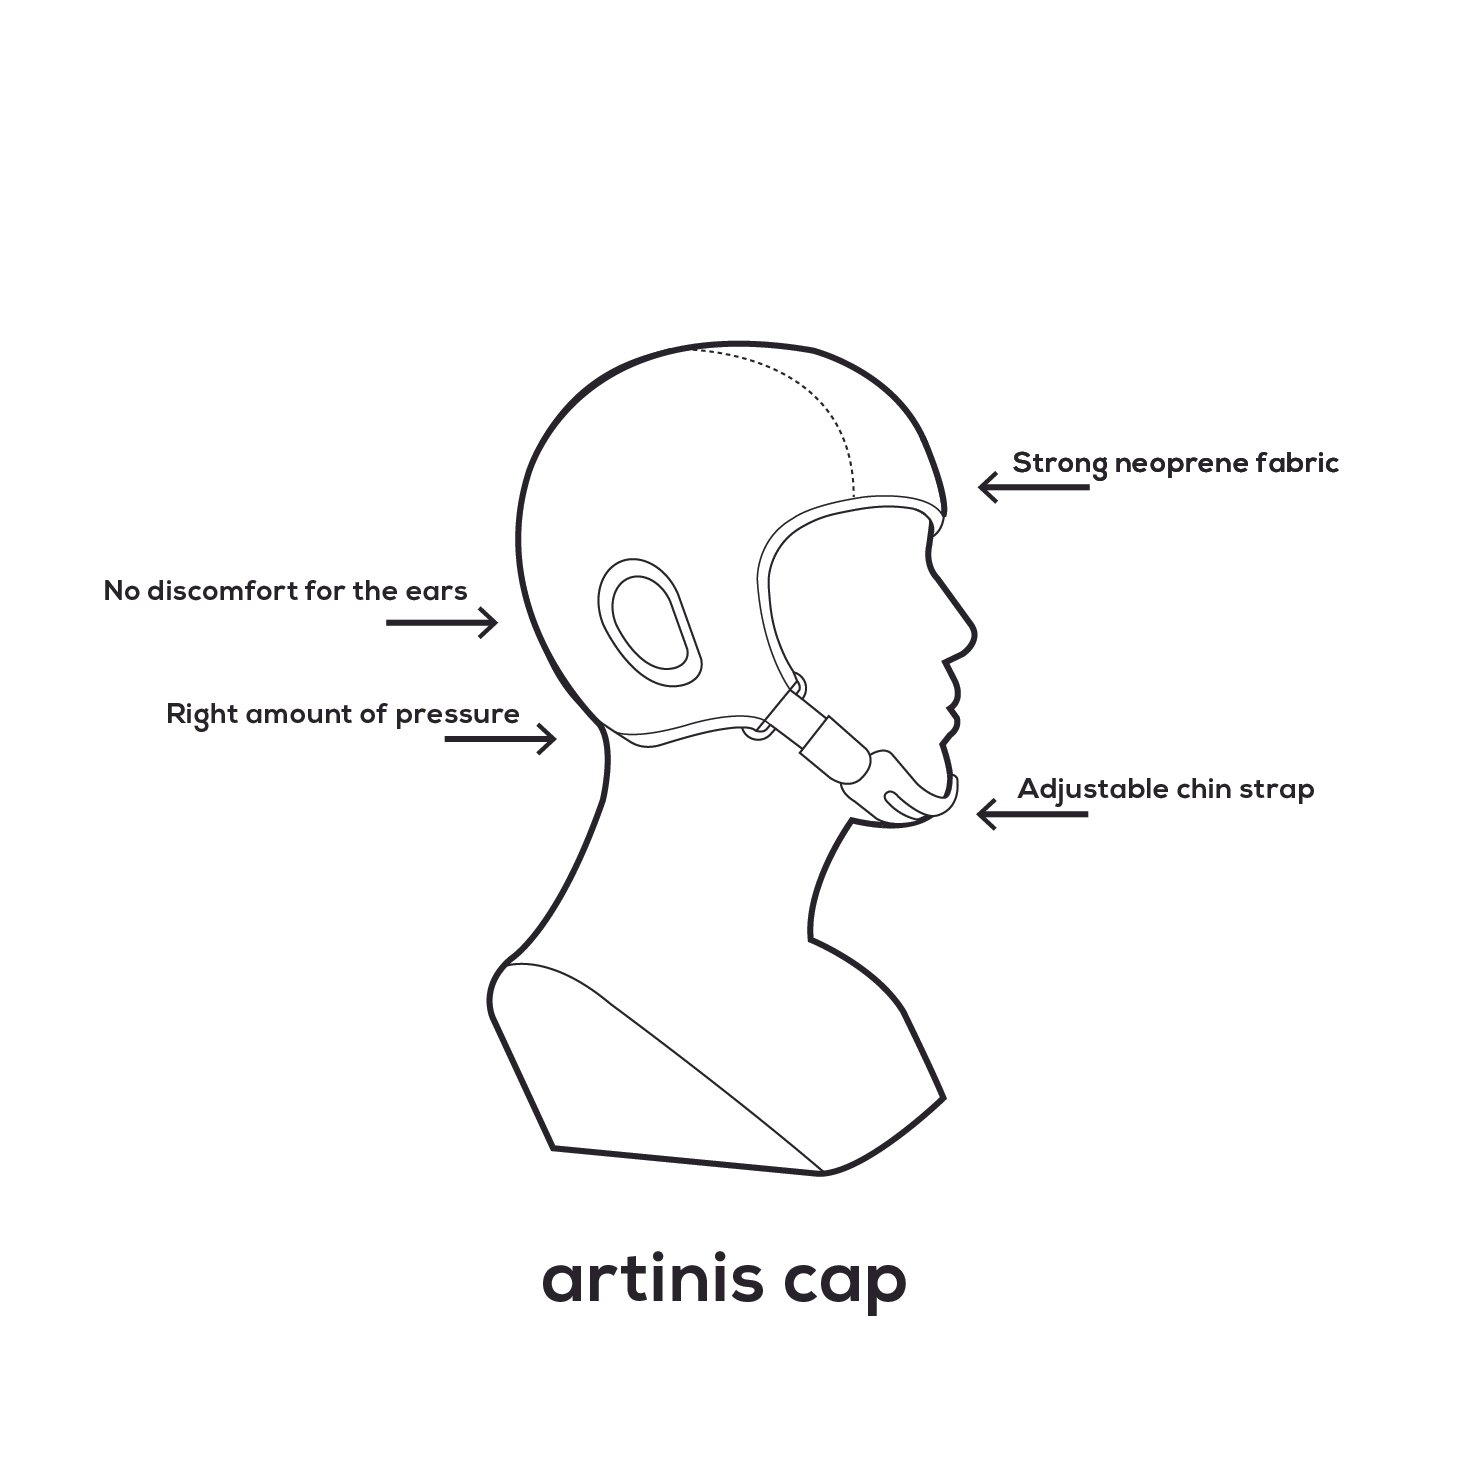
Figure 2: Artins head-cap design features
The ‘grid’ is a word we often use during development. It should be an optimized NIRS optode template with a distance of 30 mm between the optodes. We designed the head-cap so that the neoprene stretches on predefined locations, comfortably embracing the subject’s head. This stretching, however, comes at the price of changing distances between optodes. We incorporated the stretching properties into the calculations for the optimal optode positions. As the human head's shape and size differ individually, maintaining a perfect 30mm distance is impossible. We strive to optimize the distribution of distances thereby outperforming other caps on the market. Figure 3 shows how our grid compares to the Easycap. These points are measured with the Polhemus digitizer. We see that the interoptode distance is way more consistent with our headcaps.
Figure 3 On the left side is the digitalisation of the Easycap grid, the right side is the digitalisation of the new Artinis optode grid for a specific cap size. Connection lines were ommitted for shorter distances than 25mm and longer distances than 40mm.
We experienced that researchers like to refer to the 10/20 system, when they try to describe the region of interest. To support this, we have added the most important 10/20 indications on the head-cap. The user can also use these indication to position EEG electrodes for conducting a NIRS-EEG measurement. We recommend to verify the correct position of these indication for each subject. We used a silkscreen print method to visualise the ‘NIRS optode grid’ and the 10/20 system indications onto the Artinis head-cap (figure 4).
Figure 4: Artinis head-cap for kids, also compatible with the Brite system
The ‘simple’ Artinis head-cap development was a journey we enjoyed. We sincerely believe that the head-cap will improve your experience with NIRS. I would like to invite you to try this cap in real-life and tell us what you think. The head-cap is at this moment available in multiple sizes. Check our head-cap page for the latest updates on the caps. The cap is also compatible with the Oxymon system, Brite systems, Octamon, NIRS holders (classic, pinch, NIRS/EEG, EEG ring electrode, and more are coming).
Some small additional remarks:
[1] The core of our optic fibers used in our laser based systems is glass. Sorry to disappoint you, but we cannot decrease the weight of the glass itself. We did change the material op the fibertip (from stainless steel, to plastic) to decrease the overall weight as much as possible.
[2] Imagine you’re using the Artinis head-cap for multiple hours, with different subjects, using NIRS and EEG (including the conductive gel) in a measurement. This is not hygienic. That is why the cap should be cleaned easily.
[3] I want to share a minor challenge we faced during our development. Do you know the feeling of having Velcro stuck in your hair, and that you have to pull it out? Well, it is a feeling multiple subjects will experience if you use normal Velcro with our chinstrap. So we used a special Velcro that does not stick to hair. It is just a minor detail, but it is the level of detail we put into this head-cap development



fMRI is widely used and seen as the gold standard in non-invasive in-vivo brain imaging. However, due to its technology, it is comes with certain limitations in participant groups and experiments. fNIRS is portable, easy to use and can be applied in subjects of all ages. Hence, it can provide a valid alternative to fMRI in many applications. In this blogpost we discuss advantages that fNIRS has over fMRI, considerations that should be kept in mind and we highlight literature using fNIRS and fMRI to compare, or get complementary information.